The Complete Guide to Floor Tile Removal: Essential Tools, Techniques, and Cost Insights for DIY and Professionals
Removing floor tile is a controlled process to detach finished tile from its substrate, preparing the subfloor for a new covering while minimizing repair costs and safety risks. This guide explains the floor tile removal process, identifying when manual methods suffice and when power tools are warranted, and outlining adhesive- and subfloor-specific strategies. Understanding thinset, mastic, mortar beds, concrete, and plywood underlayment determines tool choice and time required. You will learn essential tools, step-by-step removal and safety practices, adhesive- and substrate-specific methods, and cost ranges for DIY versus professional removal.
What Are the Essential Tools for Effective Floor Tile Removal?
Effective floor tile removal requires a mix of manual tools, power tools, and specialized machines. Manual tools suit small areas or fragile underlayments; power tools increase speed for large areas or stubborn adhesives, demanding dust control and experience. Right tool selection ensures faster removal, cleaner subfloor preparation, and lower repair costs.
| Tool | Best use / tile type | Pros / Cons / Typical cost or rental |
|---|---|---|
| Masonry chisel & hammer | Ceramic tiles, thinset on plywood | Low cost, precise; slow and labor-intensive |
| Pry bar / wonder bar | Edge removal, loose tiles | Good leverage; risks splintering on plywood |
| Oscillating multi-tool with blade | Small sections, grout cuts | Precise, low vibrations; slow on thick adhesives |
| Rotary hammer / chisel attachment | Porcelain, thick thinset on concrete | Fast, powerful; high dust, tool rental common |
| Floor scraper / powered scraper | Large areas, mastic | Efficient for adhesives; rental recommended |
| Jackhammer / mini breaker | Heavy-duty concrete removal | Rapid removal; high cost, high risk to substrate |
Manual vs. Power Tools for Tile Removal
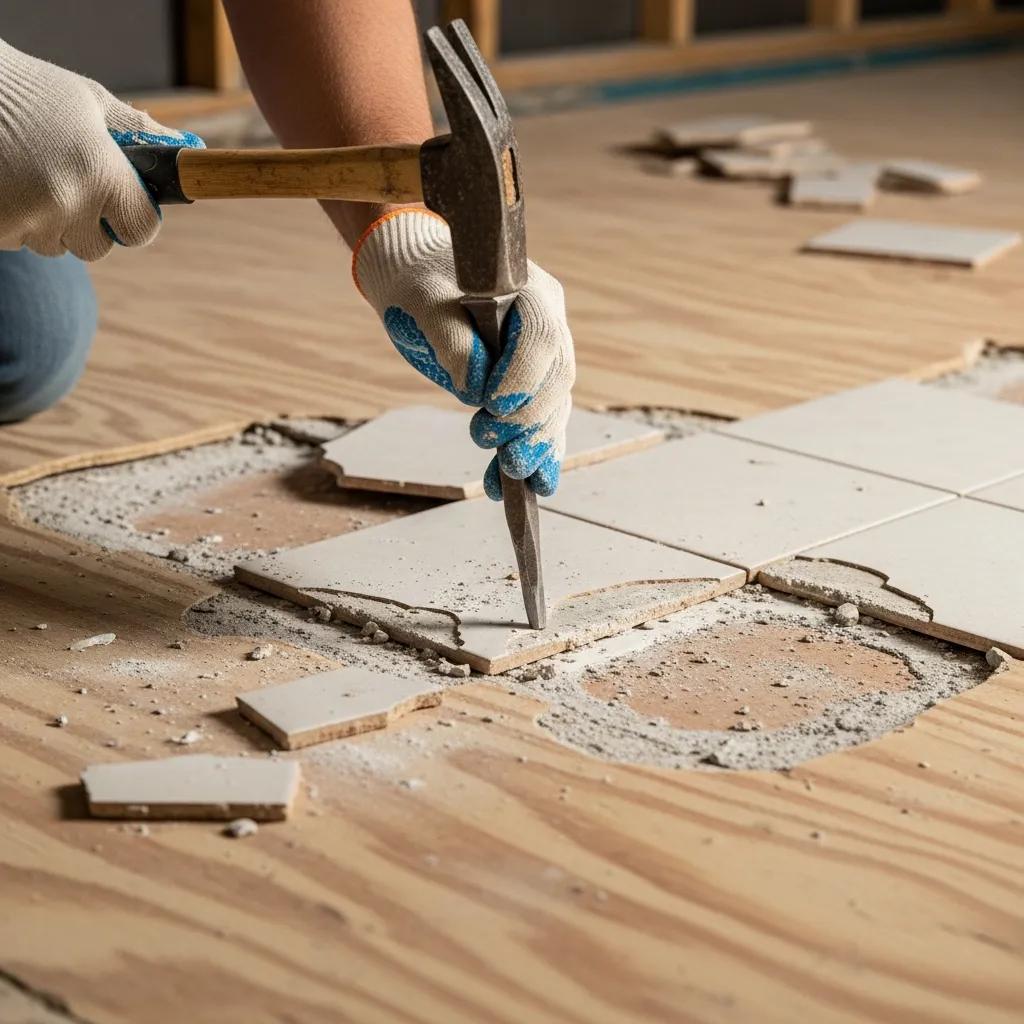
Manual tools like a masonry chisel, hammer, pry bar, and grout saw allow careful removal of ceramic and smaller porcelain tiles, especially on plywood or delicate mortar beds. Start by removing grout lines, create a break with a chisel, then use a pry bar to lift sections. This approach is slower but offers precise control, reducing structural damage risk. For larger areas, porcelain tiles, or thick thinset, power tools like rotary hammers and floor scrapers dramatically cut time. Rotary hammers with chisel bits are ideal for concrete; powered floor scrapers handle mastic. Dust control and PPE are critical due to silica dust, so pair tools with HEPA vacuums or water suppression. For more on safety, visit dust free tile removal.
How Do You Safely Prepare and Remove Floor Tiles Step-by-Step?
Safe floor tile removal combines containment, grout and tile removal, adhesive reduction, and cleanup—with consistent PPE and dust control. Proper preparation reduces airborne contaminants and protects adjacent spaces, while systematic technique reduces accidental substrate damage. This section provides a numbered workflow and safety checklist.
- Prepare the room: remove furniture, seal vents and doorways with plastic sheeting, and set up negative pressure or containment to limit dust migration.
- Remove grout lines: use a grout saw or oscillating tool to expose tile edges and reduce tile fragmentation during prying.
- Break and lift tiles: start at an edge or a drilled starter hole, use a chisel and pry bar for small tiles, and move to power chisel or floor scraper for larger runs.
- Reduce adhesives: scrape thinset mechanically or use grinders/planers for thick residue, stopping before deep gouging to preserve substrate integrity.
- Clean and inspect: HEPA vacuum debris, profile remaining adhesive to acceptable flatness tolerances, and inspect for moisture or structural damage before repair.
Protective equipment must guard against flying fragments, high-decibel tools, and hazardous dust. Minimum PPE includes safety glasses, heavy-duty work gloves, hearing protection, and a fitted N95 or P100 respirator. Engineering controls—wet methods, HEPA-filtered vacuums, and local extraction—reduce airborne silica. A methodical technique starts with grout-first removal, followed by controlled fracturing and prying to lift tiles, minimizing subfloor impact. Adhesive removal progresses from scraping to grinding as needed, maintaining shallow passes to protect the substrate. Stop if gouging or delamination appears, and use repair strategies.
How Do Different Subfloor Types Affect Tile Removal Methods?
Subfloor type—concrete slab, plywood underlayment, or a mortar bed—dictates adhesive behavior and removal aggressiveness. Matching technique to substrate reduces structural damage risk and ensures the subfloor meets flatness and moisture criteria for the next finish.
| Subfloor | Common adhesive/type | Recommended removal method & tools |
|---|---|---|
| Concrete slab | Thinset mortar, thinset + epoxy patches | Rotary hammer for tile, diamond grinder or scarifier for thinset; use dust control |
| Plywood/underlayment | Thinset on plywood, mastic | Manual chisel/pry bar, oscillating tool for grout; avoid heavy hammers to prevent delamination |
| Mortar bed / cement backer | Thick mortar bed | Mechanical breakers for tile, careful chipping on mortar bed; plan for repair or re-bedding |
| Existing vinyl/adhesive layer over slab | Mastic or contact cement | Powered floor scraper or heat gun + scraper; mechanical planing for residue |
Removing tile from concrete accepts more mechanical force, using rotary hammers, scarifiers, and diamond grinders to break tile and remove thinset while managing dust. Begin with a rotary hammer and chisel, then transition to a floor scraper or scarifier for thinset removal, using shallow passes with diamond grinders to smooth ridges. On plywood-underlayment or mortar-bed systems, prioritize manual and controlled mechanical methods to prevent tearing or splintering. Use pry bars, chisels, and oscillating tools. Avoid jackhammers and limit power scraping to low-torque attachments. Inspect underlayment for damage; replace compromised panels.
What Are the Best Methods for Removing Tile Adhesives and Mortar Residue?
Different adhesives—thinset, organic mastics, and epoxy-based cements—require distinct removal strategies, combining mechanical scraping, heat or chemical softeners, and abrasive profiling for a clean, level surface. Mechanical approaches are primary for thinset and epoxy; mastic often responds to heat and commercial solvent-based removers. Proper surface profiling ensures new flooring performs as intended. For further insight, you can check thinset and glue removal.
- Thinset removal: Use mechanical scraping with floor scrapers, rotary hammers for bond breaks, and diamond grinders or scarifiers for profiling and smoothing residual mortar.
- Mastic removal: Apply heat (heat gun) or manufacturer-recommended solvent softeners, then use a powered scraper to lift softened adhesive while minimizing dust.
- Epoxy/urethane adhesives: Employ grinders with diamond tooling or chemical stripper systems designed for epoxies, combined with protective PPE and HEPA containment.
Thinset demands mechanical action—chiseling, powered scrapers, scarifiers, or diamond grinding—taking shallow passes to avoid slab damage. Mastic responds to heat or solvent softeners before scraping. Epoxies may require aggressive grinding or specialist chemicals. After gross adhesive removal, final subfloor cleaning and profiling require debris removal, HEPA vacuuming, adhesive grinding or scraping, and moisture/flatness checks. Use HEPA vacs, diamond grinders, and straightedges. Conduct moisture testing and document tolerances before installing leveling compounds or underlayments.
What Are the Cost Considerations for DIY Versus Professional Tile Removal?
Cost decisions for tile removal balance per-square-foot labor and equipment costs, time, physical demands, and subfloor repair risk. In 2024, typical professional per-square-foot ranges reflect these variables, informing when DIY is economical versus hiring specialists.
Flooring Demolition Costs & Life-Cycle Analysis
Future costs are all the costs incurred after product , and demolition costs for the service life of the building.
A life-cycle cost analysis for flooring materials for healthcare facilities, DD Harris, 2015
| Option | Typical per-sq-ft cost range | Time / labor and risk factors |
|---|---|---|
| DIY (owner labor + rental) | $0.50–$3.00 | Lower cash outlay, higher time, physical demand, risk of subfloor damage |
| Equipment rental + subcontractor | $1.50–$5.00 | Faster removal, moderate cost; requires operator skill |
| Professional removal service | $2.00–$7.00 | Faster, includes disposal and dust control; higher upfront cost but lower risk |
DIY removes labor charges but adds rental fees, disposal costs, and potential repair expenses if the subfloor is damaged. Professionals bring efficiency, dust control, and liability coverage. Professional removal commonly ranges $2-$7 per square foot, depending on tile type, adhesive, disposal, and subfloor repairs. DIY offers lower immediate cash outlay and flexibility, but increases physical strain, extends timelines, and raises potential for costly underlayment repairs. Choose DIY for small, simple projects; professionals for large areas, stubborn adhesives, or complex substrates.
How Can You Troubleshoot Common Challenges During Floor Tile Removal?
Troubleshooting tile removal issues uses a progressive approach for stubborn tiles, inspections for hidden substrate issues, and remedial strategies for uneven or compromised subfloors. Address stubborn tiles with heat, scoring, and incremental mechanical extraction before escalating to heavy equipment that could damage the subfloor. Inspect beneath tiles for moisture, rot, or fastener corrosion that requires repair.
For stubborn or well-bonded tiles, apply progressively stronger tactics: manual scoring and chisel leverage, spot heat or oscillating-tool scoring, then rotary hammers or floor scrapers. Use heat to soften organic adhesives and an oscillating tool to undercut grout. If tiles prove immovable without endangering the substrate, consult a professional. After removal, perform a systematic inspection for flatness, moisture, and structural integrity using straightedges and moisture testing. Document findings and plan remediation, which can range from spot patching to full underlayment replacement, ensuring a stable base for your new floor. For tool rentals, check out The Home Depot Tool Rental.

